

Keep in the loop
Chair - Upcycling Project
15-05-2020
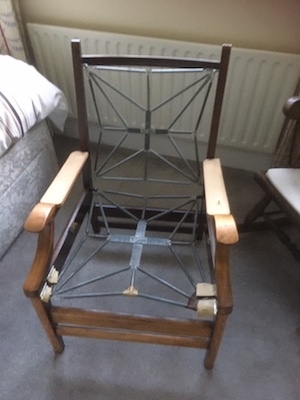
A friend and his Mum were having to clear his grandmother's house and along with the nest of tables (a previous blog) and two chests of drawers (a future blog) they asked if I would like a lovely little wooden framed chair to upcycle, otherwise it would be destined for the tip. At first I declined as it was a bit beyond my upholstery skills but a few days later I went back to collect it. It was added to the other 'upcycling' projects now collecting in our spare room and stayed there for quite a few months. The fabric was disintegrating along with the foam seat, rubber webbing and padded arms, whilst the back cushion had lost all it's shape. I decided to strip it back to the bare bones, and get rid of what turned out to be several layers of fabric and crumbling foam.
 I'd done a beginners' course with Sarah Lousie Dix to cover a stool and really enjoyed it. I wanted to learn more and this chair presented a good reason to do it. I booked onto her 10-week morning upholstery course starting in January 2020, not sure how I was going to fit it in around work, but when you are really motivated to do something it's amazing how you can find the time - and it was only for ten weeks after all. I was late booking as I wasn't sure if we would have sold our house and be moving to Devon (that's for another blog!) during the course. When we hadn't sold by New Year I thought logically that even if we sold in the next week or so it would probably take at least ten weeks until we moved. With work re-organised I was ready for Thursday mornings!
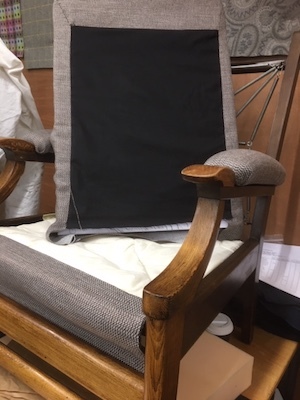
I loaded the chair into the back of the car and headed off to Farncombe, about thirty minutes from home. The course started at 10.30 (and finished around 1.30pm). I left shortly 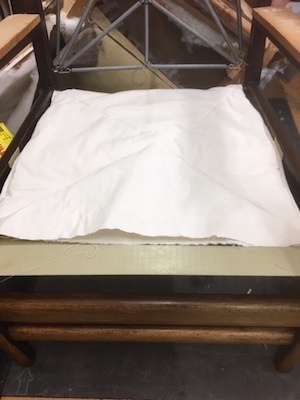 after 9.30am as I wanted to leave enough time for any traffic issues as well as offloading the chair and then finding somewhere to park. I arrived, took the chair into the workshop, found a parking space on a side street, nipped into the coffee shop (which Jeny and I had found when we did our beginners' course) grabbed a coffee and headed back to the shop. There were some women already there with chairs in various stages of being re-upholstered. It soon became apparent that there were only three of us out of ten that were starting this course as complete beginners. The other students had attended varying numbers of 'terms' to complete their specitifc projects or simply kept on enrolling with new projects. Our 'projects' were all placed up on tables so they'd be easy to work on. As I had stripped my chair at home of all the old upholstery my first task was remove the old perished remains of the webbing (it was rubber rather than a cloth webbing) then to clean and oil the wooden frame. It was lovely to see the wood revive, change and come to life as I oiled. Once this was complete the next task was to replace the Pirelli (yes as in tyyres!) webbing, stretching it over the chair using a 'slot and peg' webbing stretcher, and staple it down - two strips of webbing at the front and one about half way down the seat. Sarah helped me do this as we pulled the webbing tightly over and held the chair in place! Next I made the cloth covering (as seen in the photo) that was held in place at the back of the chair wth two pieces of elastic and would eventually have the fabric attached that would come over the front of the chair and be secured behind the first piece of wood. The time went flying by and before I left for home I had to choose my fabric so that it could be ordered and arrive for the next lesson. I decided, as this was my first attempt and I had no idea what I was going to do with the chair, that I would choose a relatively inexpensive fabric that was stain-proof and hard-wearing but would compliment the wooden frame.
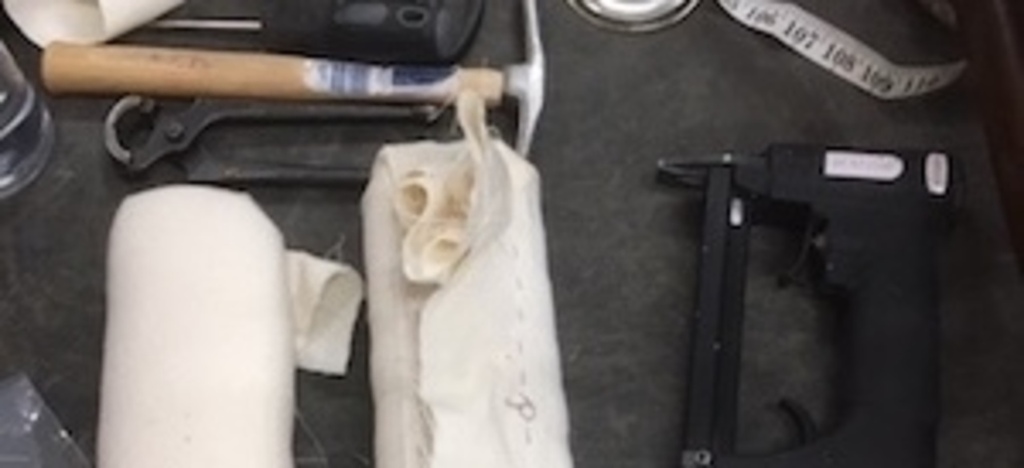
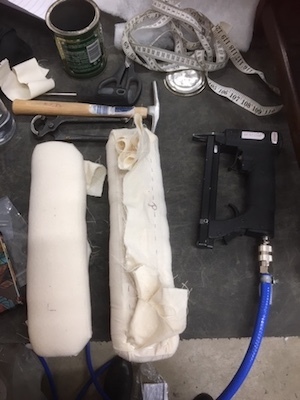 Unfortunately when I arrived for my second lesson my fabric hadn't been delivered and was due the next day. I wondered how I was going to fill three hours. I needn't have worried, there was still plenty to do! The padded arms of the chair needed covering which involved cutting some foam to size with an electric carving knife - which takes some practice! Glue is sprayed from a can to hold the foam in place and that's covered with calico which is tacked and then stapled down. My favoutrite tools were definitely the magnetic hammer and compressed-air staple gun - so satisfying to hear the gun go cha-dong, cha-dong as you stapled. As for the spray glue that gets stuck to your fingers and then, as I discovered with when covering the calico with polyester padding, easily picks up anything you touch until you have large fluffy fingers! The arms were now ready for the fabric. On to making the pattern for the base and back of the chair using brown paper so the foam could be ordered and cut to size for the seat and back cushion. I decided on what thickness of foam I wanted for the seat and base with Sarah's experience - I would've had no idea. I know that doesn't sound like I did a lot that lesson but that was three hours filled.
 My fabric had arrived for my next lesson so I could now order the covered buttons for the back of the chair. More decisions: who knew there were so many options? What size? What type of pattern did I want them to make on the back of the chair? How many to order? After some discussion with Sarah and a couple of my fellow students the decison was made and the order placed for the buttons. Back to work on the chair. The fabric was cut to cover the arms and to stitch to calico base to then come over the front of the chair and be stapled in place. I must have measured and double checked numerous times before I felt brave enough to cut the fabric for each piece. Phew! They all fitted and by the end of that session I had attached the newly padded and covered arms back onto the chair and had the base seat covering secured in place. The sessions absolutely flew by with chatter going on amongst us and the radio on. Every now and then we'd stop as someone wanted an opinion are how the pattern of a fabric should be placed on a chair, what colour trim to use or again what pattern of buttons to use. I certainly look at furntiure, especially those with patterned fabric and buttons, in a very different way these days!
The back cushion was the next thing I tackled. It was unusual as it had an additional back flap that attached to the main cushion. The flap then came over the springs but behind the wood at the back, it then dropped down to the base where it was secured to the wooden rail. Working out how to do it and what the measurements were for the different pieces took a lot of grey brain cells working hard to get right!
 Luckily my Mum had taught me how to sew when I was younger and I've sewn on and off throughtout my life, from making my own clothes to repairing things, so I am very familiar wtih patterns and how to use a sewing machine. Once the cushion cover is made it's that 'hold your breath moment' as you fit it over the back foam cushion. Next comes the placement of the buttons and everyone who had placed buttons before advised me to arrange them 'by eye' rather than measuring between them. With the help from a couple of other students standing back from the chair saying, 'Up a bit, no that one down a bit, over to the left, that one back to the right...' we finally agreed on where they should go. The large needle, used to push button thread through the foam, is lethal as it has a point on both ends, but you do forget! One pricked and bleeding finger was evidence that I had forgotten on at least one occasion. I thought all the button decison making was over - how wrong could I be? Now I had to decide how tight I wanted to pull the buttons into the back of the chair before securing the thread with a knot. Thank goodness I only had six buttons to do! Another student whose chair was being covered in buttons (like a Chesterfield design) looked at mine with envy - she was still placing and securing her buttons after two sessions and had a lot more to go!
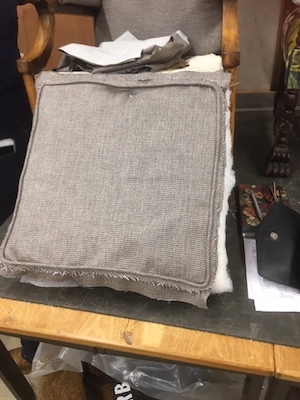
The final thing left to do was to make the seat cushion. I was now on week six of my ten weeks as I began that task. I wanted to learn as much as I could on my first attempt so chose to have piping around the edges of the cushion both top and bottom. More decisions: what thickness of piping cord did I want? Having chosen the cord, the fabric then needs to be cut on the slight bias so that it fits neatly around it and stitiched to enclose it. Next I needed to cut the sides out plus the top and bottom pieces of the seat. Putting the pieces altogether was a whole other challenge, both in the level of concentration it took to ensure it was in the right place and do it this time using a commercial sewing machine. Stitching tight to the piping as you attach it around the corners of the cushion cover takes real skill in my opinion, as does making sure the sides of the cushion are the same size all the way round as you attach them to both the top and bottom cushion pieces - anyone who masters it deserves respect!
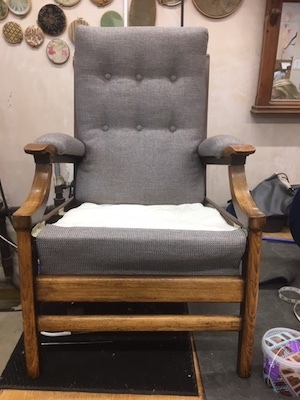
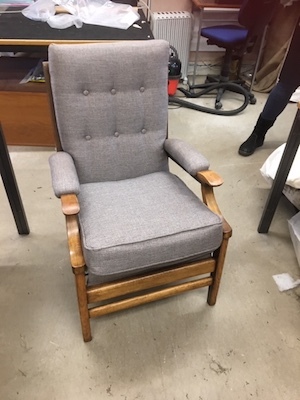
Finally after week eight the chair was finished and I was proud of my first attempt, but more importantly pleased that I'd rescued this lovely solid, little chair from being scrapped. It gets to have a whole new life. I have also found a new respect for upholsterers and can fully understand why having a piece recovered costs what it does.
I am now on the hunt for my next piece to have a go at! Any offers??
I'll be chatting to Sarah on my podcast GillHB & Friends


