

Keep in the loop
Hand Caning furniture.
20-08-2019
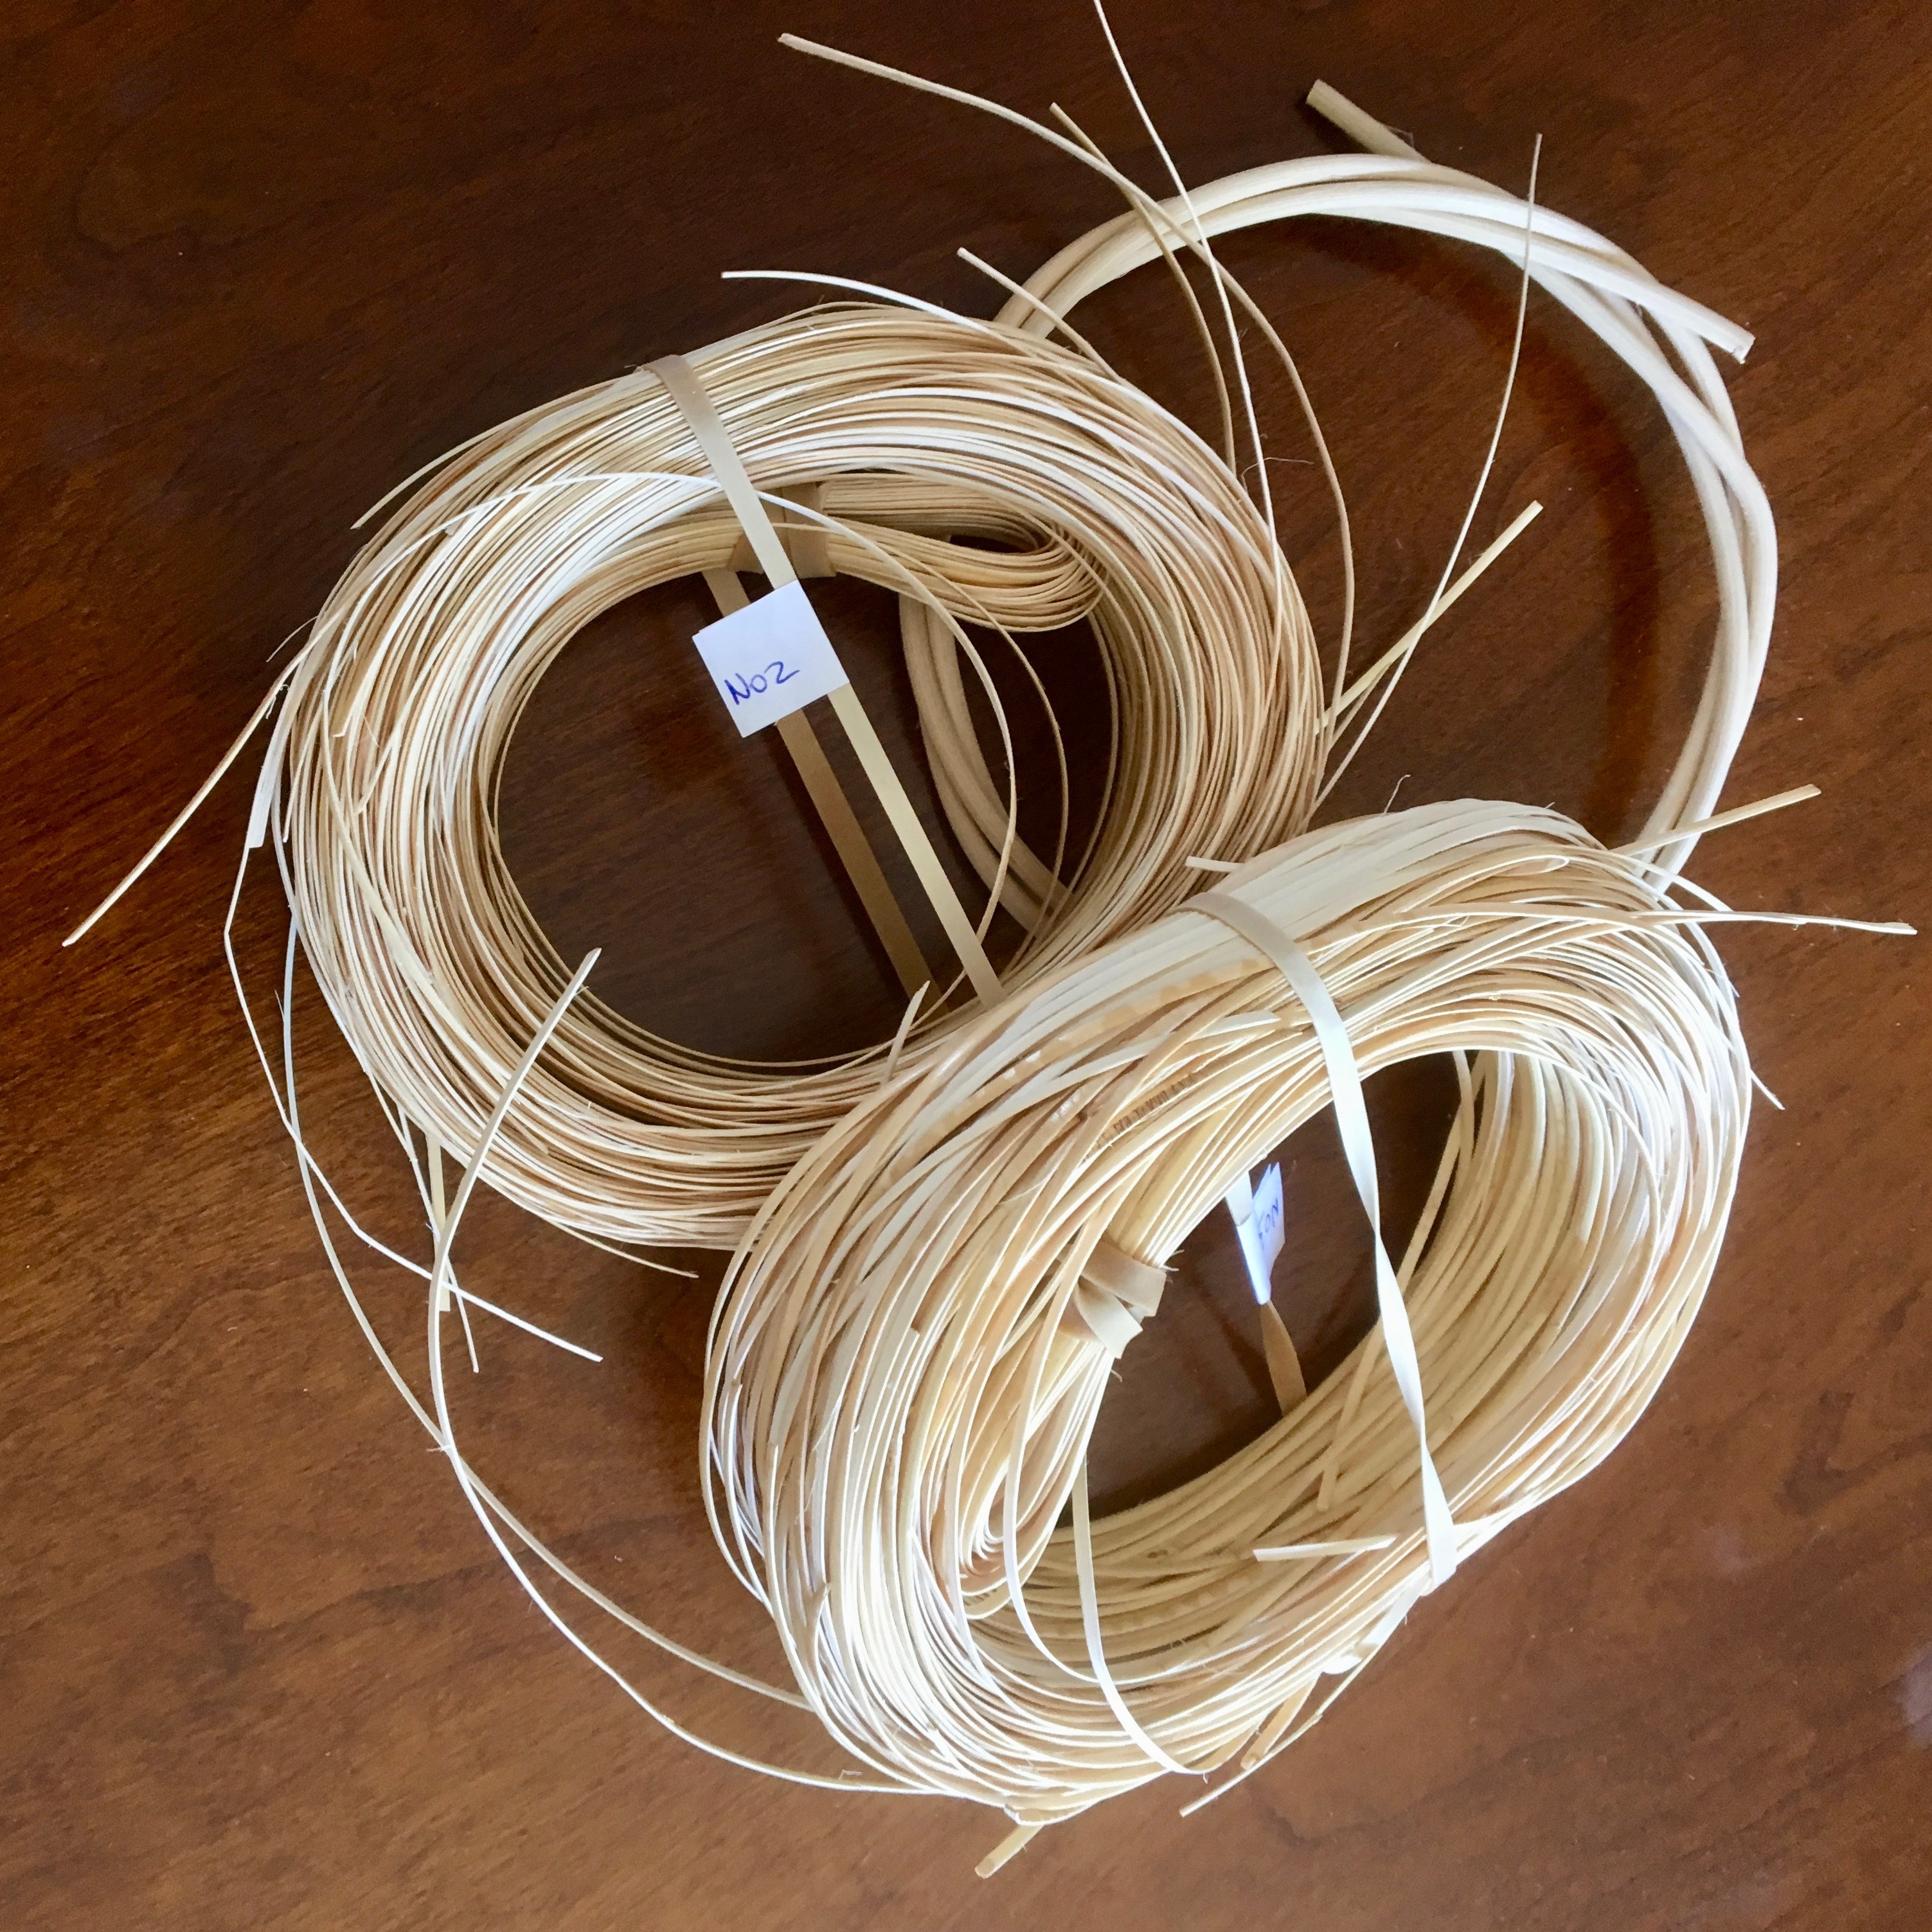
Last year, having been inspired by the BBC programme 'The Repair Shop', I decided to 'up-cycle' a couple of pieces of dark stained, wood furniture I have had since they were given to me for my first flat some 40 years ago! It was either that or they were destined to be put on Freecycle or go to the tip. As I currently have no workshop to work in or shed big enough (that's this year's project) I had to wait until we had a few sunny days to do them. I rubbed them down and painted them. I put what I thought were dirty bronze handles in a tub of water, vinegar and bicarbonate of soda to soak only to discover they were copper. Both pieces of furniture turned out well and I wanted to learn more to enable me to do other projects. I've always been fascinated by cane, rush and basket weaving type skills and decided to look for a hand caning course so I could recycle chairs that needed their seats re-caning. 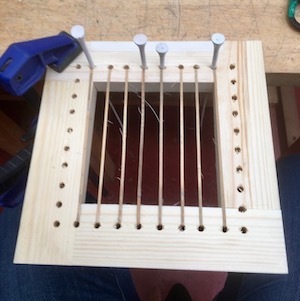 small, preformed wooden square with holes drilled into each side. In the middle of the table was a large pot of golf tees, several awls (a small pointed tool) and scissors. On a bench to one side was a couple of bowls of water with cane soaking in it, each bowl with a different sized cane in it. We were going to learn how to do the 6-step pattern. I must admit, as did the others at the end of the day, that I thought, "How on earth is it going to take all day to cane this square?", I soon found out!
Rachael demonstrated each step one by one (in case you are wondering the golf tees are used to hold the cane in place whilst you weave) and then let us work on our own block. Steps 1, 2 and 3 were fairly straight forward, if you can call feeding a long strand of cane through holes without it twisting, getting in a tangle or breaking - just when you don't want it to - straight forward! At 11 o' clock it was coffee time and in came the 'tea / coffee' lady with her tea trolley containing drinks and biscuits. We were engrossed in our caning not wanting to stop until we reached the 'other side'. Rachael told us if we wanted a drink to get one quickly before 'the tea lady', (actually it was the lovely young assistant who had checked us in on arrival) wheeled her trolley on to another class. I grabbed a cup of coffee and biscuit and went back to my caning - this was getting addictive! Eventually we reached Step 4 and the start of the weave: under, over, under, over - expletive muttered under my breath - missed one - unpick - go again - over, under. Whilst we were caning there was general chat around the table learning about each other: one lady was on holiday from Canada, another who did intereior design, the French lady was in finance and the only male was in insurance but made his own furntiture. It was a lovely environment to learn a new skill and meet like-minded people.
Lunch was promptly at 1pm and if you had brought your food you could eat in the communal area or alternatively there were several food outlets nearby. I chose to go and buy my lunch and bring it back to The Goodlife Centre to eat it in the communal area. We started again at 2pm but admit we had all returned to the classromm early as we were eager to keep caning.
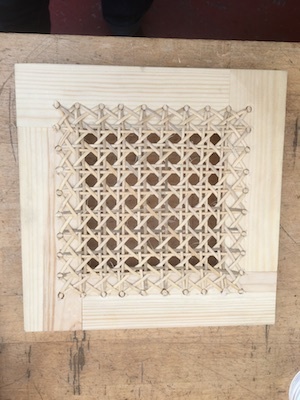
The sun had come out by the afternoon and was shining through the glass roof and canopy, I mention this because it became very relevant to our caning as the room warmed up a lot compared to the morning. The warmer the room the faster the cane dries out and becomes more brittle to work with. Rachael went and got us some small bowls of water to keep dipping our fingers in to keep the cane damp as we were busy working with it. As we approached the end of step 4 Rachael stopped us and explained steps 5 and 6: the weave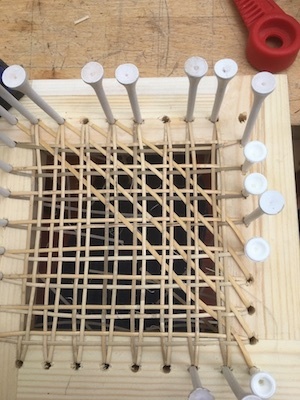 across the diagonals. Going from bottom right to top left is referred to as going from 'London to Liverpool' and bottom left to top right is known as going from 'Yeovil (who knew my home town was used in hand caning?!) to York'. These steps took my concentration to a whole new level, it was still a case of over and under but it was much easier to thread the cane into the wrong space or even miss a hole! It was amazing how Rachael could spot a 'twisted cane' or 'missed weave' from the other end of the table and a lot of unpicking took place amongst us. Luckily the 'tea lady' appeared again at 3pm so we had a quick cuppa and on we went. The recognised pattern was now becoming evident and as the cane dried so the square tightened up. We all laughed about what we had wondered at the start - how such a small square was going to take all day to complete. Finally the time came to remove all the golf tees, turn the square over to tidy up the ends (bascially for this method it meant cutting them off as close as possible to the hole) and securing in the cane pegs. The cane pegs were made from a cane cord which was placed into the hole, cut just above it and then hammered down into place.
My caned square was complete! I felt a great sense of satisfaction from having learnt a new skill, met some lovely people and having had a lovely day. I said goodbye to everyone, picked up my hand caned square and headed for Waterloo to catch my train. I bumped into a couple of friends on the train and couldn't resist showing them what I'd been doing all day. Their faces did say what we had all thought on entering our classroom: 'What? All day?'. They understood by the time they got off the train...
A big thank you to Rachael South for her patience and passing on her skill. I'm sure I'll have a million questions once I start my chair!
< back to listings
I started looking in January for a reasonably priced course that wasn't too far away and suitable for a beginner. I considered the course at West Dean College but it was residential Friday to Sunday and you needed to take your own piece of furniture, which I didn't have. I found the one-day course at The Goodlife Centre in London, they run a wide range of courses from DIY to the more crafty type courses. It was reasonably priced, held on a Sunday starting at 10.00am (not too early a start for me to travel into London) and no need to take anything with you as they provide you with a 'wooden square' to cane. Perfect. The course runs every few months and, checking my diary on 2nd January, the earliest course I could do turned out to be July! I booked and was eager to get started.
The 7th July arrived and luckily the Sunday trains were behaving with no engineering works so I arrived in London Waterloo on schedule. The Good Life Centre is about 15mins walk from the station and I arrived about 9.40am. I walked in, registered, was offered a drink and told to take a seat. As I sat down the lady (Jessie) next to me said she was also on the hand caning course and we started chatting. Shortly afterwards we were called through to our room which was filled with various upholstery items with a large table and stools in the middle. The room itself had a glass roof with a fabric canopy slung beneath it - apparently it could be really cold in the winter but hot in the summer, which we discovered later that day. There were 5 of us on the course and we all had various reasons for wanting to learn how to hand cane. Alison, the owner of The Goodlife Centre, introduced our tutor Rachael South. I recognised her and said that I thought we had met, but it turned out later that I had seen her on 'The Repair Shop' repairing a beautiful old caned cot.
Rachael spent a short while explaining how she came to be in the industry as well as about the cane, from the rattan plant, that we would be using. In front of each of us was a
Rachael demonstrated each step one by one (in case you are wondering the golf tees are used to hold the cane in place whilst you weave) and then let us work on our own block. Steps 1, 2 and 3 were fairly straight forward, if you can call feeding a long strand of cane through holes without it twisting, getting in a tangle or breaking - just when you don't want it to - straight forward! At 11 o' clock it was coffee time and in came the 'tea / coffee' lady with her tea trolley containing drinks and biscuits. We were engrossed in our caning not wanting to stop until we reached the 'other side'. Rachael told us if we wanted a drink to get one quickly before 'the tea lady', (actually it was the lovely young assistant who had checked us in on arrival) wheeled her trolley on to another class. I grabbed a cup of coffee and biscuit and went back to my caning - this was getting addictive! Eventually we reached Step 4 and the start of the weave: under, over, under, over - expletive muttered under my breath - missed one - unpick - go again - over, under. Whilst we were caning there was general chat around the table learning about each other: one lady was on holiday from Canada, another who did intereior design, the French lady was in finance and the only male was in insurance but made his own furntiture. It was a lovely environment to learn a new skill and meet like-minded people.
Lunch was promptly at 1pm and if you had brought your food you could eat in the communal area or alternatively there were several food outlets nearby. I chose to go and buy my lunch and bring it back to The Goodlife Centre to eat it in the communal area. We started again at 2pm but admit we had all returned to the classromm early as we were eager to keep caning.
The sun had come out by the afternoon and was shining through the glass roof and canopy, I mention this because it became very relevant to our caning as the room warmed up a lot compared to the morning. The warmer the room the faster the cane dries out and becomes more brittle to work with. Rachael went and got us some small bowls of water to keep dipping our fingers in to keep the cane damp as we were busy working with it. As we approached the end of step 4 Rachael stopped us and explained steps 5 and 6: the weave
across the diagonals. Going from bottom right to top left is referred to as going from 'London to Liverpool' and bottom left to top right is known as going from 'Yeovil (who knew my home town was used in hand caning?!) to York'. These steps took my concentration to a whole new level, it was still a case of over and under but it was much easier to thread the cane into the wrong space or even miss a hole! It was amazing how Rachael could spot a 'twisted cane' or 'missed weave' from the other end of the table and a lot of unpicking took place amongst us. Luckily the 'tea lady' appeared again at 3pm so we had a quick cuppa and on we went. The recognised pattern was now becoming evident and as the cane dried so the square tightened up. We all laughed about what we had wondered at the start - how such a small square was going to take all day to complete. Finally the time came to remove all the golf tees, turn the square over to tidy up the ends (bascially for this method it meant cutting them off as close as possible to the hole) and securing in the cane pegs. The cane pegs were made from a cane cord which was placed into the hole, cut just above it and then hammered down into place. My caned square was complete! I felt a great sense of satisfaction from having learnt a new skill, met some lovely people and having had a lovely day. I said goodbye to everyone, picked up my hand caned square and headed for Waterloo to catch my train. I bumped into a couple of friends on the train and couldn't resist showing them what I'd been doing all day. Their faces did say what we had all thought on entering our classroom: 'What? All day?'. They understood by the time they got off the train...
A big thank you to Rachael South for her patience and passing on her skill. I'm sure I'll have a million questions once I start my chair!


